 |
|
|
|
Last Updated: 4/18/18
Part I: Eggs through Hatching (on this page):
Introduction
Egg Information
Collecting Eggs for Hatching
Incubating Chicken Eggs
Candling Chicken Eggs
Hatching Chicken Eggs
Part II: Chicks (on the second page):
Sexing Chicks
Brooding and Raising Chicks
Natural Chick Rearing
Introducing Chicks to the Flock
"Don't count your chickens until they hatch!" There never was a more true saying.
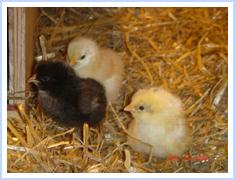
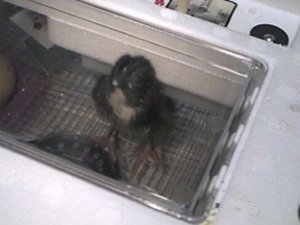
I tried to hatch chicken eggs. I did not have much success. I hatched one baby finally on 5/2/02 after four incubations with 50 eggs from 15 different hens. See the page on my chickens for more information. In the process, I learned TONS about incubation and raising chicks from books, the internet, and experience. I would like to share it in hopes it may help someone else. Here is a photo of my baby Beebee on 5/2/02 about six hours after hatching. Unbearably, Beebee was killed by a fox on 3/24/04.
I had read half a dozen books on chickens, a few brochures, a dozen web sites, and three sets of incubator directions but still could not get any chicks to hatch except Beebee. But, I am a wealth of information so if you have a question, you can ask. I only put down a few of the things I read here since I do not feel qualified. I know the right things to do but so far, they have not worked except for one lucky little baby!
A lot of the information on this page can be applied to other similar birds to chickens such as turkeys, pheasants, quail, guinea fowl, peafowl, etc. Some things are slightly different for birds like ducks, geese, and swans mostly in that the eggs must be kept at the right humidity and misted. When born artificially, those birds should not be given water to swim in as they do not yet have the glands they need to waterproof their feathers (in the wild, their mother provides it). They should, of course, have plenty of fluids to drink! While I have never hatched other birds aside from my dearly departed Beebee, I have read a lot and wish I had the time to write it all down to share! My head is going to explode from memory overload!
A lot of this information can be used to raise similar birds like turkeys with a few changes. Turkey eggs hatch in 28 days instead of 21 days.
On 3/30/18, I started incubation of 14 fertile chicken eggs that I bought. For details, see this page.
As of 4/18/18, seven surviving eggs are in lockdown, and I am hoping for a hatch. I have re-read the books I have and dozens of web sites and forum posts. I will add things I have learned below.
Neat Egg Information:
The white worm-like "things" in chicken eggs that all the women in my family have always removed over the years are called the chalaza cords. The cords holds the yolk in position in the egg. They are edible despite our family tradition.
The spot where the baby would or will grow is called the blastoderm and is the white spot
attached on the yolk itself. If you break open a newly laid egg, supposedly those that are fertile
have a donut-like blastoderm while those that are infertile are irregularly-shaped solid spots.
Chickens can lay eggs with two yolks, an egg with an intestinal worm in it, or even a double egg
which is very rare.
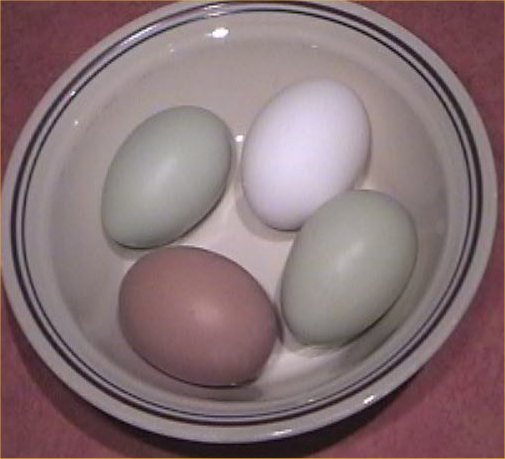
You can usually tell whether a chicken will lay a brown or white egg by the flap of skin under its ear. If the flap is white (like Clarice's and Poulet's), the eggs are white. If the flap is red (like Salty's, Henri's, new Henri's, and Pondet's) or another dark color, the eggs are brown. Spicey laid green eggs, and her flap was kind of blah colored, almost greenish.
Most chicken hens (that are laying) lay an egg every day when it is warm enough! A cockerel does not need to be present to lay infertile eggs. Fertile eggs can be collected for incubation or set under a broody hen (one who wants to sit on eggs). If a rooster is removed from the hen or dies, eggs will remain very fertile for about a week and then decrease in fertility so that by three weeks after their last mating, no eggs will be fertile.
Eggs that you intend to try to hatch should be taken care of delicately. They should not be washed or gotten wet. You can use a dry paper towel to wipe off debris and chicken poop. Fresh eggs should not be incubated right away. Instead, wait a day or more. One "chicken guy" told me this was to let the yolks settle but I am not so sure. It may have more to do with the egg cooling down well before incubation commences. Eggs should be stored at 55 to 65 degrees F with sources ranging from saying 50 degrees F to 75 degrees F. Below 40 degrees F, the embryo is supposed to be killed but I put in an egg that went down to 20 degrees F outside, and it grew for 17 days before dying right before hatching. Above 80 degrees F, the egg will start to develop. The humidity for storage should be 70% according to some sources but as low as 50% and things should be okay. Eggs should be stored with the large end up (I used an egg crate but they can be placed on their sides in a natural position). The large end is where the air cell will be. If stored more than a few days, tilt the eggs in a different direction at least once a day (I did it twice a day). Eggs retain most of their fertility if stored less than one week in proper conditions. By two weeks, about half of the properly-stored fertile eggs will be dead. By three weeks, basically all stored eggs will be dead. The cooler the storage (but not lower than the high 40's degrees F), the longer the eggs stay viable.
There are a wide range of incubators that are sold. Each has different operating parameters so follow the directions that come along with the incubator that you have. Buy two thermometers (or six!). If they do not agree within a few degrees of one another, buy a third thermometer. Household thermometers will not usually give correct readings. You need a high end thermometer specifically for incubation or for keeping tropical reptiles. My lizard had a thermometer/humidity combination that I used to verify the incubator thermometer. I also borrowed a NIST calibrated thermometer from work (I am a chemist) to get the temperature just right. My first incubator thermometer was off by 8 degrees F! That probably killed my first batch of eggs.
If using an egg turner, set it inside the incubator. Before starting incubation, let the incubator run for at least three hours with a day being better. This insures that you have adjusted the temperature correctly, and it will stay constant enough. Once in the incubator, eggs need to be turned at least three times a day by hand if a turner is not used. Write with a pencil (pen will get in and harm the babies) on each egg with an X on one side and an O on the other side. That way, you can turn them all to the X side at one turning and to the O side at the next turning. Try to turn an odd number of times so a different direction stays down over the longer time during the night. Mother hens turn their eggs at least a dozen times a day as they wiggle around and move the eggs. The reason eggs will never hatch if not turned often is that the embryo and/or yolk will stick to the inside of the egg's outer membranes/walls. If the yolk or the baby on the yolk get stuck there, they cannot develop properly. When hand turning, it is best to wear clean nitrile gloves to avoid putting human skin oils on the eggs which could block the pores (reducing oxygen into the egg and baby).
The incubator temperature depends on the model and whether it is still or forced-air and whether an egg turner is being used. Forced-air incubators (with fans) should be set to 99.5 degrees F in most cases. In still-air incubators, a temperature of 100-102 degrees F at the top of the eggs may work better as the bottom of the eggs will be a few degrees colder. Water should be kept in the bottom of the incubator all the time and increased during the last three days. Ventilation holes should be kept open. Humidity should run about 40-50% during incubation and increase to 60%+ for hatching (the last three days).
Incubation Tips:
Additonal Information I Have Learned in 2018:
1. Every book, web site, and set of incubator instructions will have a different suggested temperature and humidity! The average over all of them seems to be that for a still-air incubator, the temperature at the top of the eggs should be 100 degrees F. For a forced-air incubator, the temperature throughout the incubator should be 99.5 degrees F. And, they tell you to maintain it within +/-0.5 or 1.0 degrees F. Well, in the real world, good luck! When I set up my new incubator and turner, the temperature fluctuated, without touching the thermostat, from 93 to 103 degrees F over the first 18 days. It was normally between 96 and 102 degrees F with an average near 100. Why did it fluctuate so much? I thought it was the incubator but, when I put the eggs in to lockdown and removed the egg turner, the fluctuations stopped. So, my theory is that the egg turner motor is not on constantly like I assumed but instead moves, stops, moves, stops. When moving, the temperature goes up.
2. When you add water, it is best to use distilled water so that you do not accumulate dissolved solids in your incubator. I would microwave about 2/3 a cup of water in a tea cup for 15 seconds to make it feel about 100 degrees F. I had a piece of rigid aquarium airline tubing. To that, I attached a short piece of flexible aquarium airline tubing so that I could attach a syringe. I would then feed the rigid tubing through the air holes in the top of the incubator, add water to the syringe, and, if it did not flow down, use the plunger to fill up not only the troughs in the bottom of the incubator but a few other collections of water that I created. I put two half plastic Easter eggs in the turner and kept those full of water. I also put two plastic lids under the floor and added water to those as well. This allowed me to get the humidity in the 35-45% range the entire time with water added twice a day.
3. Many people suggest dry hatches. That is when you add little to no water but it does NOT work if your ambient humidity is next to nothing like in my basement. Some chicks might survive with humidity as low as about 25% but not much lower than that. Humidity above 50% creates the opposite problems with the chick's air cells not becoming large enough to hatch properly.
4. When you add water to the incubator such that the humidity goes up, the temperature will come down. Do not adjust the incubator as it will come back up as the humidity goes back down.
5. If you remove an egg turner for lockdown, once the incubator is going again, the temperature will go down. Mine went down 5 degrees F! I slowly raised it every 30 minutes until I got it back to 99 degrees F. Many people lower the hatch temperature a few degrees from the temperature used for the first 18 days such that 98 or 99 degrees F is fine. The chicks will be generating some of their own heat by then.
6. When I needed to open the incubator, instead of taking the entire top off which lets out most of the heat and humidity, I removed one of the plexiglass windows. I could then fix an errant thermometer, remove eggs for candling, etc. If you are hand turning or adding water without going through the vent holes, then you can also do that through the windows to reduce heat and humidity loss.
7. I cut two pieces of styrofoam and put those over the plexiglass windows with two pound lead diving weights for the first 18 days. This is supposed to help insulate the incubator and make it more efficient.
8. I had seven thermometers and three hygrometers set up with the incubator at first! Three of the thermometers were NIST calibrated. Each and every one said something different. Even in a forced-air incubator, the temperature and humidity are different depending on position. For example, near the egg turner motor and heating elements, it is warmer. Near the fan, it is cooler due to the moving air. I wrapped one of the NIST probe thermometers in a Ziploc bag of water to replicate the temperature inside of an egg, and it was always at least two degrees cooler than any of the other thermometers. I could never really figure out what the real temperature was! To some degree, I had to stop caring.
9. When you candle, do not move the eggs much, especially when they are young. I found that if I put the eggs in an egg carton, I could shine the candler on top of them and see the air cells and chick movement if the timing was right without even touching them. Holding the egg up and shining from below was helpful for the Day 7 candling but, for later candlings, it showed the entire egg to be dark. Spining and turning the egg so you can see things or see someone move is not something I recommend. While it is educational, fast movements can harm the baby, and I would not want to be moved all around.
10. While drawing the air cell in pencil on the egg can be helpful, I was more afraid of accidently breaking the egg or keeping them out of the incubator too long. I could just tell by looking if the air cell was ok. I could not see the air cells at 7 days really. I marked them at 14 days.
Eggs can be candled to see if the eggs are fertile and developing. When taking eggs out to candle, remove them one at a time. Wear gloves. I used disposable nitrile gloves. This reduces the amount of human skin oils that are added to the egg. The oils can clog the pores in the eggs which are needed for proper oxygen exchange. Only open the incubator long enough to remove an egg or put one back.
With candled white eggs, veins can be seen by about three days. It may be as long as six days to be able to see veins in dark-shelled eggs. There are a number of candlers that one can buy but they cost a lot of money for basically just a light. I built my own "candler" by taping a toilet paper roll to the end of a Mag-Lite (high power) flashlight. Setting the egg over the end of the roll allows light to penetrate. Moving the egg gently around lets you see the various parts of the egg. After just three days, fertile eggs often appear to have a darker yolk shadow. By a week, live eggs should have an obvious network of veins. By two weeks, the egg will be about 75% black and light will not pass through it. There will be an obvious air cell at the large end of the egg. The size of the air cell will tell you if the humidity in the incubator is good. If the cell is too small, you need less humidity. If it is too large (more common), you need more humidity. The two-week old living embryo will also have a clear area left at the bottom of the egg that is the remaining albumen (egg white). If the egg is held still over the candler, movement should be seen as shifting shadows. Do not candle after 17 days as this may harm the baby. At 17 days, a viable egg is totally black except for the air cell. It is probably too black to see movement. In the cases were eggs are overdue (past 23 days), candling may be done to help access the situation. If the egg is 100% black, then the baby has penetrated the air cell. If you cheep to the egg, it should cheep back. In that case, increase the humidity in hopes he might still hatch. If not, the chick may have died. If the egg still has an air cell, then put the egg back. Eggs rarely hatch past 23 days but I normally recommend keeping them in the incubator up to 28 days just in case.
Here is a site with candling information. There are many sites out there discussing different birds' eggs. Just search the internet for "candling eggs."
Candling - site shows some photos of various candled eggs.

Cheeping, pipping, and hatching.
Eggs should be removed from the egg turner (and the egg turner removed from the incubator, putting the eggs back to lay naturally on their sides) or stopped being turned at 19 days. The humidity should be increased to around 65-70%. The addition of damp sponges may be needed to accomplish that if the air humidity is too low. The babies will move around into position and break into their air cell at about 20 days. At this time, you are supposed to be able to hear them cheeping. The eggs hatch after 21 days. The chicks should not be disturbed while they are hatching which may take a day. Do not open the incubator after day 19. I used a straw and funnel to pour water down through the air holes and onto the sponges and into the water troughs twice a day to keep the humidity up. Opening the incubator will lower the temperature and humidity and could harm the babies.
Eggs may hatch a day late. At two days, the chances are lower that an egg will hatch. Beebee in fact hatched after 23 days though. Remove unhatched eggs after 25 days (4 days late) as there is no way they will hatch. If you want to be extra sure, wait a full 4 weeks.
My baby broke the air cell after 22 full days and hatched on the 23rd day so that is possible! If the incubator is not in need, then waiting until 27 days will ensure you do not miss a late-hatching chick. I cut three sponges into 4 pieces and wet them and put them in 6 stacks of two over the bottom grate and put an extra grate on top of that. That elevated the eggs for hatching up about 1.5 inches so they were closer to the vent holes and would not suffocate. I do not know how well it worked but I finally got one baby out of 5 full-term babies to hatch.
If after day 21.5, there is no sign of hatching, open the incubator which is a "no-no" and do the following. Add or re-wet all the sponges, water troughs, etc. This will boost the humidity. This sounds dumb but pick up a few eggs and cheep loudly at them. This may entice them to do something. Then, put the lid back on. I then cheeped repeatedly over the air holes to entice Beebee to live and hatch. Once the chick(s) break the air cell, the chick(s) will peep back. You may not hear it unless you are holding the egg close. It was not until I opened the incubator and re-wet the sponges that were out of reach of my straw contraption that my baby broke the air cell. After 22 days, I went to candle the egg and saw the air cell broken. Then, I heard that first peep, and there is nothing like it! After putting the egg back, it was not possible to hear the baby peep through the incubator even with my ear to the air vent.
Beebee (see my chicken page for more information and photos) which is the only baby chicken I have hatched decided to break his air cell at exactly 22 full days at 9 pm on 5/1/02. At 6:30 am the next morning, he made the first dent in the shell or pipped. He was totally hatched by about noon (I had to go to work and missed it after having taken off the previous two days to see the hatch!). When I came home at 5 pm, he was running around the incubator making a lot of noise and had moved all the other eggs and thermometers around. He was still a little damp but I was afraid Beebee would burn himself on the incubator heating coils that Beebee kept touching. At 9 pm that night, I put him into the chick box. He drank some water that night and was eating by the next morning. (I wished Beebee was a girl and used "she" previously but after I knew he was a boy, I had to go change them all back to masculine in 2003!)
|
|

|

|
E-mail RobynCopyright © 1997-2026 Robyn Rhudy |

|
 |