 |
|
|
|
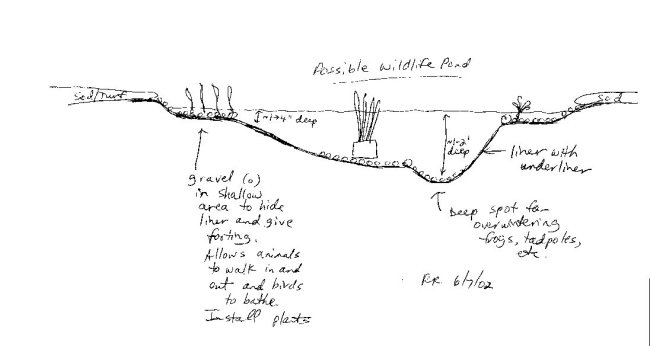
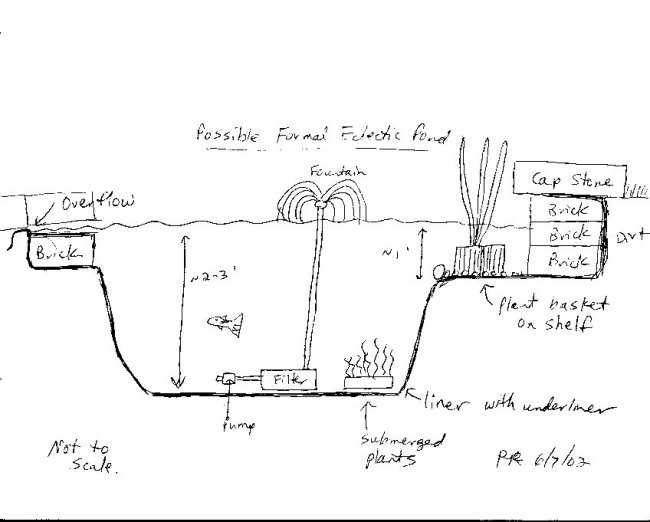
Sample Pond Drawings
Site Preparation
Liner Installation - underliners, liners, installation
Edging
Overflows
After Completion
Links
Information on my other pond pages:
Pond Setup
Wildlife Ponds
Filtration

153 gallon pond blueprint - this is the blueprint I drew up for the 153 gallon pond before building it in October 1999.
Before you can start your pond, you need to decide where to put it. First, be sure you are aware where all buried things may be. These include electrical lines, phone lines, cables, house or water drains, water pipes, sprinkler systems, septic tanks, and more such things. It is imperative that such lines be moved, protected, or that the pond be located somewhere else. For more pond, I had to avoid the pipe that drains from around the house and reroute one of the down spouts so it would not drain above the pond when it rains. If there are utilities where you want to dig, you may have to call the electrical, phone, or cable company for permission. It is also good to avoid areas with overhead electrical or phone lines if you can in case they fall down or need servicing. Consider where the existing plants are in the yard. I like to avoid killing as many plants as possible. We dug up and moved a bush and some flowers but most of the area was sod. You can transplant plants away from an area to save them but allow a pond. If you want to reduce leaf litter, place the pond away from trees as well. Large existing trees may have roots that extend into the area where you want the pond. It may be wise to move the pond farther away or cut the roots and put up a blockade of some sort to try to keep them from pushing on the side of the pond. Cutting a tree down is a last resort in my mind but many people do so to make their pond dreams come true. Others have build ponds next to large trees, making tree wells and structures to protect both the trees and the pond.
Once the site is decided, it is time to check out how your blueprints are going. If you have not made those blueprints, go do that first using measurements of the area in question. Then, measure the area again to check the blueprint. When ready, use non-toxic spray paint, chalk, or stakes to mark out the area for the pond. You can also use long electrical cords on the ground to try out various shapes and locations for the pond. Next, de-sod the area for the pond. If it is a small area, do this by hand and save the sod to put in a spot of your yard that needs sod. If it is a large area, rent a de-sodding machine that makes it very easy to remove the grass. Then, it is time to get that shovel or back hoe and start digging! Be sure not to overdig an area. It is much easier to take dirt out than to put it back and retain support.
Underliners:
Once the hole is complete, it is important to put down a soft support for the liner. This protects the liner from rocks, tree roots, earth shifting, etc. The most common underliners are sand, crushed gravel, old carpet, newspaper, felt (commercial underliners), and scrap liner. My 1800 gallon pond has a base of crushed gravel. It is not the best as it does have small sharp spots but a contractor put in my pond and did not ask my advice (I was just starting out anyway). My 153 gallon pond has a bottom base of sand and then an Ultiliner which is a 45 mil EPDM liner already glued to a felt underliner. Felt underliners are commonly sold from most places that sell liners. My buried 50 gallon tub pond has a sand base but is not a liner but a hard-shelled circular pond. Sand works best for pre-formed ponds. People wishing to save money can use old carpet under the liner. I would think it might be a bit thick for the purpose but it is better than nothing. Another choice would be a sand base covered with newspapers. The newspapers will slowly degrade over time but not as fast as you might think and add a nice cushion for the liner.
Liners:
In the 1980's, PVC liners were the liner of choice. The problem is that they degrade rather quickly. Most pond liners today are EPDM. There are also Butyl liners which are even better but cost more money. The standard liner pretty much is 45 mil EPDM. There are other fancy liners coming out like Xavan but I do not know much about them. Some people use roofing liner as it is cheaper. If you want to use that, be sure it has not been treated with chemicals as many are. It is safest to buy a liner sold specifically for ponds.
Of course, there are also pre-formed ponds which have a hard-shelled plastic or fiberglass already formed and ready to bury.
Installation:
Here are the steps to install the liner:
1. Prepare the site.
2. Dig the hole.
3. Check the level around the top edge of the pond. The top edge should be level.
4. Install underliner. Be sure area is smooth and free of any sharp objects.
5. Lay liner into the hole. See that it is going to fit. If too small, some dirt may need to go back
or a
larger liner purchased. If it fits, gently start to push the liner into the hole to form fit it.
6. As you form fit it from the bottom up, add some water to help force the liner to fill the
hole.
7. Continue to fill the pond, making adjustments in the liner as you go up. As you get higher up,
install
the edging. Rocks may be installed before filling if the liner is solidly in place.
8. Once completely full, install all the edging.
9. Squirt down the edging and liner fully.
10. If the water is dirty, drain the pond. Use a shop vacuum to get the last mud/dirt/debris
up.
11. Refill the pond. It is good practice to use a water meter to know the exact volume of the
pond. If
it is under 200 gallons, you can bail known quantities of water into the pond to get the exact
volume
which is how I know my 153 gallon pond is 153 gallons. They did not have a meter when they
filled
my 1800 gallon pond so that volume is from measuring the various lengths, widths, and depths of
the
various parts of the pond and making a mathematical estimation which is not the best way.
Here are some possible edgings to use:
The drawings above show how the edging can work. They show how I did the edging for my 153 gallon pond to hide the liner.
Be sure to buy extra edging as you may need more than you think. I ran out of edging for both my 1800 and 153 gallon ponds. For the 1800 gallon pond, it meant a hefty bill to have a truck bring in another ton of PA fieldstone. My 1800 gallon pond thus is edged with PA fieldstone as is my 50 gallon lotus tub pond. My 153 gallon pond is edged with patio bricks with regular bricks down into the water to hide the liner. My 18 gallon wildlife pond (basically it is a deer drinking trough) is edged with rocks dug from our own property when they put in water lines. It is granite with some formica. See photos of all these ponds on my pond pictures page to see the edging.
Any pond over about 100 gallons should have a dedicated overflow. You can see in the sample ponds above where the overflow would be. Basically, you lower the liner and edging at the end of the pond from which you wish water to flow during heavy rains and flooding. If you do not chose which way the water goes, it will make its own decision.
See another section on overflows on the pond talk page.
After the pond is full, wait a week or two. Why? First, if you have city water, this allows chlorine to dissipate. If you use dechlorinator, then that is not a problem. If you have chloramine in your city water, a dechlorinator that can also neutralize ammonia must be added as chloramine will not dissipate over time to safe levels. Even if you have well water, like me, this time allows the water to settle, release gases, age a little, and things will start to happen! What? Algae will grow (not as bad as you think!), mosquitoes will lay eggs (don't panic!), if it's spring, toads and frogs will lay eggs (great! This happened the first week of my pond!). During this time, you can add pond plants if you like. They will help speed things up. Some people like to add some local pond water to innoculate their ponds but be careful as along with good bacteria, insects, etc. also come parasites and bad bacteria and critters too and of course, our friend algae. If you want to add pond water, try finding a pond without fish (so probably no fish parasites) or algae to get that water. You can also buy microcritters (daphnia, euglena, paramecium, scuds, etc.) if you want from some place like L.F.S. Cultures but they tend to live better in established ponds, and fish will eat them when/if you add fish. Also, buy your fish now but quarantine them elsewhere and treat them for any problems.
After those two weeks are up, add in a few fish. Not too many! See my pond setup page for more information. The fish will be SOOOO happy! They will scarf up those mosquitoes which will NOT have had time after two weeks yet to turn into adults. They will eat other insects that will have shown up. They can nibble on algae and plants. The fish will be MUCH happier in a slightly aged system as it provides stable water (chemistry, temperature), sources of food (bugs, algae, tadpoles for larger fish), and places to hide (algae, plants now growing).
More information:
Water Chemistry
Algae
Mosquitoes
Frogs and Toads
Fish Health
Wildlife Ponds
Later, I will add in sites with pond construction information. If you know of one I should add, let me know.
See my pond sites page.
One of the most traveled pond construction sites is Pond Rushes by Chuck Rush.
E Home Resource page on installing ponds.
Return to the main pond page.
|
|
Pet Link Banner Exchange: |

|
|
|
There have been 51,181,002 file views (file views since 2006, page views before that) to Fishpondinfo from December 1, 2003 through August 17, 2019 (stats lost after that). |
|

|

|
E-mail RobynCopyright © 1997-2026 Robyn Rhudy |

|
 |